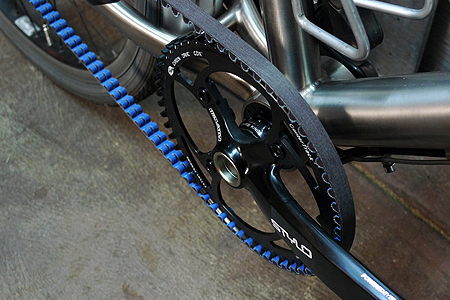
September 2012 - The start of a new Era! Changing the Drivetrain to the Gates Carbon Drive System.
We've been thinking of replacing our Thorn Sterling Frames with something a bit more heavy duty as Thorn Cycles do put a 15 kg load limit on the Sterling Frame. We generally carry slightly more than this when we tour and we've been over some very rough roads, but we can report that we've never noticed any sort of problem with them. It did however start to worry us a bit during the Sweden-Finland Tour, so on return to Australia we started to look for other options.
We considered the new Thorn Nomad Mk2, but having wanted to try a Gates Carbon Drive for some time, we were steered towards frames which have a split in the rear triangle so that the belt can be fitted.
Having investigated most of the frame manufacturers listed by Gates, we eventually decided on the Van Nicholas Pioneer frame. Being titanium it also offers some advantages over other frame materials, with the biggest disadvantage being cost. As titanium frames go, Van Nicholas seem quite reasonable (particularly since the perfectly sized bike was listed in their Outlet store).
With that, the selection of components began, with the final list as shown in the Table below. Much of the list is made up of our previous gear which has performed so well.
We'll give the Gates Carbon Drive system a few months of daily commuting before providing some feedback on how it compares to the normal chain drive system that we are used to (LINK to Review). If you're interested, you can check out our experiences on the specific components that we have used up to now, which is getting considerable as most items have done approximately 54,000 km on Mike's bike, and over 39,000 km on Judith's bike.
Table of Current Touring/Commuting Bike Components (Click on the links within the Table to see our reviews below)
Component
Mike's Bike
Judith's Bike
Frame:
Van Nicholas Pioneer Titanium Touring Frame, Size 58 cm
Thorn Nomad Mk3 Frame & Fork, Size 55L Van Nicholas Pioneer Titanium Touring Frame, Size 52 cm (Frame cracked (seat tube) and was replaced by Van Nicholas under warranty - Thorn was purchased in the meantime)
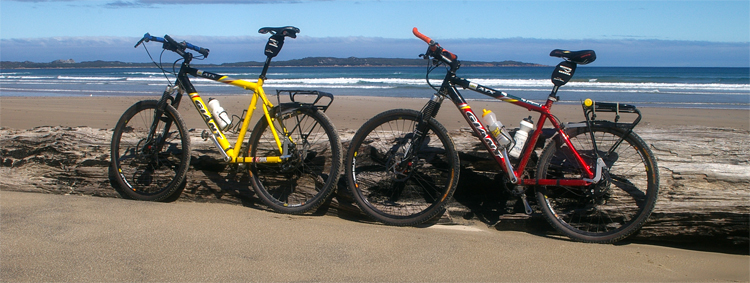
Photos of the Van Nicholas Pioneer Belt Drive Bikes
September 2009 - Converting Hardtail Mountain Bikes to Rohloff Speedhub Specific Frames
After 32,000 combined kilometres of using our Rohloff converted hardtail mountain bikes as touring/commuting machines, in September 2009 we decided to take the plunge and order frames specifically suited to the Rohloff Speedhub. We had narrowed the selection down to steel frames made by Thorn in the UK (http://www.thorncycles.co.uk/) and sold through the shop front of St. John Street Cycles (http://www.sjscycles.co.uk/), but the decision as to which model was difficult. Requiring a Rohloff Speedhub specific frame narrowed the choice down to either the Thorn Sterling, or the Thorn Nomad with S&S Couplings.
Details of the two bikes can be found at the Thorn website, but basically the Sterling has a mountain bike geometry and can be used for "light" off-road touring, while the Nomad is a stronger do-it-all round-the-world heavy-duty tourer. Thorn have no faith in disc brakes, but both bikes do have mountings for disc brakes at the rear, but the fork which is included with the Nomad does not allow for these to be fitted (the Sterling does not come with a fork, but is designed for suspension forks). As we prefer the durability issues of disc brakes (and less rim wear being a major factor for winter commuting in Perth), the significant cost saving, the lighter weight, and what generally seems to suit our bicycle touring better, we decided on Sterlings (with the thought that we wouldn't have lost too much if we ever decided to upgrade to the Nomad).
Out of the box, the Sterling is beautiful in its Matt Black finish and has all the brazed on fittings for the EX Box Rohloff, mudguards, cable routing, etc. It comes with an FSA headset (which we would replace with a Chris King Headset) and a basic Thorn seatpost (which we would replace with a Thomson Elite seatpost) - So basically it was just the frame we were after. One surprise was that the frame didn't come with any bolts to seal the bottle cage mounting holes, etc.
As with the previous bikes, these were built from scratch with the components described below. Thorn advised that they couldn't treat the inside the frames prior to shipment (air-travel) so we ended up trying Heavy Duty aerosol Lanolin by Lanotec (http://www.lanotec.com.au/) to treat the inside of the frame tubing. It was applied very easily and initial impressions are that it should do a good job of preventing internal rust.
When choosing components for the bikes, we always try and use what we believe is the best equipment for the job at hand. All components have always been ordered separately from many suppliers and put together by ourselves. Having built the bikes from scratch, one also learns how all the pieces fit together which may help with maintenance if/when stuck in the middle of nowhere. Besides being very rewarding completing the build ourselves, it was also great to select each component individually based on its merits.
Thorn offer a steel rigid fork for the Sterling as an accessory, but it does not take disc brakes. As mentioned above, we prefer the mechanical disc brake option for commuting and touring, and the Big Dummy fork offered the nearest match with regards to the Axle-crown (425mm), and rake (43mm) measurements so that geometry/handling wouldn't be affected. These forks also come with all the mudguard mounts and cable routings, and were also treated with the lanolin to prevent rust. The black colour is slightly more gloss than the frame, but is close enough for our liking.
These are one of the best on the market and come with a 10 year warranty.
Handlebars: Titec H-Bar handlebars (heavily trimmed for comfort and handlebar bag access)
These are absolutely super comfortable and although require a bit of lateral thinking to install the Rohloff shifter, are probably one of the best things one can add to a bike. Highly recommended.
UPDATE September 2012: I would have loved to get similar bars to the H-Bars for the new build (to suit an OS stem), but it seems that they are no longer available. Very disappointing! As I've really got used to the swing-back riding style, I couldn't go back to normal bars. This led me to the On-One Mary bars, and at the price, could easily try them out without feeling obligated to use them forever. That said, they have proved to be a winner. Due to the very long Head Tube on the Van Nicholas Pioneer frame, I've ended up mounting the bars upside down to get a similar riding position that I'm used to, but that only adds to the uniqueness of the setup. I've even had a few comments on this while on the road.
Thorn Accessory Bar T Shaped 105 mm Extension
Due to the H Bar design, mounting an Ortlieb handlebar bag on this allows easier access to the bag, and prevents the brake cables from clashing with the bag.
Handlebar Bag: Ortlieb Ultimate 3 Handlebar bag (with rolltop closure)
Not sure if you can get these anymore, but they are super waterproof and very good quality. Only used when touring, but the mounting bracket stays on the bike always.
These must be the best mechanical disc brakes on the market, and we just can't understand why Thorn are so negative towards disc brakes. Sure, one can understand that touring with hydraulic discs could be a maintenance nightmare, but these mechanicals require next to no maintenance and the pads wear very well (I just replaced a rear set of pads after 12,000 km of commuting- Ok, maybe I did leave it a bit long...). The main benefit is that there is no wear on the rim. When I was commuting on a road bike, I wore out numerous pads in a year, and a rear rim didn't even last more than 3,300 km in the Perth winter sandpit (and this was taking care to clean the pads daily)!!! Recently tried the Jagwire Ripcord brake cables with sealed housing running between lever and brake. Brake levers are the low cost FR5 levers which do a very capable job.
UPDATE November 2012: Having made the conversion from disc brakes to V-brakes, we've come to the conclusion that both types have their advantages and disadvantages. We could live with either type, but at the moment we are happy with the rim brakes.
Advantages of Disc Brakes:
– Pads last a very long time (probably around 3 times longer than standard rim pads i.e. non-CSS) - But are more expensive
– No rim wear
– Much, much, cleaner than rim brakes (rim brakes truly make a mess of the rim after riding in the wet)
– Slightly more stopping power, particularly in the wet (not really/enough of an issue)
Advantages of Rim Brakes:
– Super easy to maintain
– Very easy to dial in (to avoid rub)
– Less susceptible to oil contamination from the Rohloff Speedhub - This was in fact the main reason we originally switched.
– Easier to get the rear wheel seated when trying to line up Rohloff axle plate, disc, etc - Again, not that big a deal.
It will be interesting to see how the CSS rims wear as I believe that they will address that disadvantage, and possibly the wheel cleanliness issue, too. Time will tell.
For those that do many kilometres commuting and touring, the Rohloff Speedhub may possibly be the best invention. In February 2008, we took the plunge and ordered two of the hubs from the US not really knowing how they would perform. However, reading the great reviews, and having a friend who swore by them, tipped the scales and made the decision easier. Having both used a hub now for 18 months (with a combined mileage of over 32,000km - 19,500km on one, and 12,500km on the other), we believe that its probably the best addition to our cycling equipment that we could have ever made. And, that was on converted hardtail MTB frames. With the new Thorn Sterlings, and their Rohloff specific OEM dropouts, one can only imagine how great they are going to be. No more chain tensioner, and consequently, the chain life should be extended from the 5,000km to maybe 20,000km (as we've read).
We decided to go for the disc versioned external gear mechanism with EX Box as this seemed a better solution than the internal gear version. As we were retro-fitting, we had to go with Model No. 8022 (black). Following the directions in the manual was easy and the hubs have performed faultlessly since. To all those people who say that you can't shouldn't take high-tech equipment on a tour as you can't maintain/service it, the Rohloff is in a class of its own when it comes to maintenance. Every 5,000km you replace the oil, and well that's about it (and that's really easy too)! If you are clocking up a lot of kilometres, we suggest you buy the 1L tins of cleaning fluid and Rohloff oil as the cost savings are considerable.
We laced the 32 hole hubs to a Mavic XM819 rims, but probably wouldn't do this again as fitting non-tubeless tyres can be a hassle. Best to stay with XM719s.
UPDATE February 2011: The two Rohloffs have now done 35,000 km and 23,000 km respectively and are still performing flawlessly. Not having a chain tensioner is really great, but the funny thing is I find that I can't push the chain much past 5,000 km. It really starts to make a noise and the sprocket starts to show excessive wear. The efficiency just seems to drop off so I still tend to change the chain and reverse the sprocket about every 5,000 km. Judith on the other hand, changes chains every 6,000 km, and reverses the sprocket only every 12,000 km. Different riding styles I guess.
UPDATE July 2011: The Mavic XM819 rims are in the bin! Just before leaving on tour I found that Judith's rim had cracked at the valve hole (about 3.5 cm each side). For a cross mountain rim to crack with her usage is pretty poor, so I can only put it down to the pressures required to try and seat the tyre when inflating. On return from the same tour, I noticed hairline cracks in the same place on my rim. The rim has never had a hard knock in its life, and I use a tensiometer when tensioning the spokes so am confident that I didn't exceed the recommendations (if I remember correctly, I don't think I went more that 110 kgf, but I'm not 100% sure - I did check the requirements at the time though). That said, I'm not that unhappy to replace the rims as it was a major mistake to use tubeless rims in the first place. The hassle of trying to seat the tyre after a puncture is really annoying (you could add any four letter word you like!). We decided to replace the rims with Rigida Andra 30 rims which are specifically drilled for large diameter hubs like the Rohloff, so it should be a good strong wheel. For information, the XM819 rims lasted 40,000 km and 26,300 km respectively.
UPDATE December 2011: The two Rohloffs have now done 45,000 km and 32,250 km respectively and are still performing flawlessly. I was quite impressed recently as I managed to get 7,000 km out of a chain/sprocket combo before feeling any sort of loss in efficiency - That could be a record for me (SRAM 850 chain for those interested). Judith continues to get in excess of 10,000 km (or 11,000 km) from a sprocket. Another interesting fact: The Schwalbe Marathon Plus on the front has surpassed 25,000 km and still has tread, whereas the rears usually only get anything between 7,000 km and 10,000 km before the blue puncture protection layer is showing!
UPDATE September 2012: The two Rohloffs have now done just under 54,000 km and 39,000 km respectively. Mike's Rohloff seems to be getting a bit "stiff" when on the repair stand, but he doesn't really feel it on the bike. As part of the new Gates Carbon bike setup, he will switch to Judith's Rohloff for a while (as she's just got a new silver one!) to see if he can feel any difference. Maybe it's just time for a bearing service! Will report back when the "test" is over.
UPDATE January 2013: Okay, the test is well and truly over and after much time wasted through various circumstances, it turned out that there was indeed a more serious problem with the Speedhub. The issue is discussed in more detail HERE, and there is also a short video showing the problem which was only really apparent in the small gears; that's probably the reason why it took me so long to diagnose that there was in fact a problem at all. I also discuss the great service received from Rohloff Australia (and Germany); Rohloff really stands behind its products!
More details on the gear range, efficiency, assembly, copy of manuals, in fact all you want to know about the Speedhub, Check out the online version of the Rohloff Technical CD --> HERE
Used during summer and for touring when lighting (dynamo) is not required. The hub is laced to a 36-hole Mavic XM719 disc rim which offers very good durability. DT Swiss Competition spokes (256mm long) complete the front wheel.
Front Hub: Schmidt Original Nabendynamo (SON) front disc dynamo hub
Arguably the best dynamo/generator money can buy. Low resistance when off, and negligible resistance when on. Used during winter when dynamo lighting is required. The hub is laced to a 36-hole Mavic F519 rim which offers very good durability.
UPDATE March 2013: The SON Dynamo only makes its appearance during winter when it's needed to power the Edelux headlamp. That said, it's currently got 26,500 km on its odometer and it continues to work flawlessly. Truely a great product; German of course!
Lighting: Schmidt Edelux LED Headlight running off the dynamo hub
Having used a 200L Dinotte LED and Ayup LED lights on the front (at different times), I can confirm that the Edelux is brighter than each and has a better beam pattern. AND, you never have to worry about charging (or replacing) batteries. If you're building your own wheels, the costs of the Schmidt system versus similar battery systems are really not that different.
Seatpost: Cane Creek Thudbuster LT (for touring, not commuting)
These seatposts are great for long days in the saddle, particularly when grinding away on rough roads. Feels strange at first, but doesn't take long to get used to. Couldn't use it for everyday commuting, as when pushing along on good quality roads/cycleways, you can feel some energy being absorbed (and you just don't need the additional cushioning). A must have for touring though.
UPDATE: Since getting the Brooks Swallow Saddle (for him) and the Rido R2 Saddle (for her), these seatposts have become redundant and will probably not be used again.
Great saddle if you can get it at a good price, so much the better. I was getting saddle sores on my 53km daily commute, but after fitting this baby, I haven't had one since. Many people complain about the break-in period, but I honestly didn't find this to be the case at all. Sure the saddle is super comfy now after 14,000km (As at August 2012, saddle has been used for 47,500 km), but it was more comfortable than my previous saddles at the start anyway. I will definitely get another one of these in time, but would probably not splurge on the titanium version, but rather go for the steel rails.
UPDATE October 2012: So after 50,176 km of super-comfy cycling, the Swallow started to eat through my Assos shorts. In fact, my new shorts were almost worn through in two weeks. I've used the Brooks Proofide treatment on and off throughout the saddle's life, and tried it again to see if that would solve the problem. It didn't, so the saddle is off the bike as it costs about as much as a single pair of shorts! As I had a new Brooks B17 lying around, I thought that I would give it a go. Once again, super-duper comfy straight out of the box! I really love Brooks saddles.
Bottom Bracket: Phil Wood Stainless Steel Square Taper
Phil Wood offer one of the best bottom brackets out there. We went for the 68 x 123 JIS version; stainless as weight doesn't matter too much, and longetivity does, and the 123 mm long spindle ensured that the 54mm chainline for the Rohloff. Don't forget when ordering, that you also need to get the cartridge cups (and tool if required). Went for Stainless there too.
UPDATE February 2011: The original Phil Wood bearings on the non-drive side of the bottom bracket failed suddenly (and catastrophically) just shy of 35,000 km of service. I was quite surprised at the suddenness of the failure which changed a fully functional bike to a bike that couldn't be ridden at all. But I suppose that after that kind of distance (in all weather) and no maintenance at all, still not a bad performance. Replaced both bearings with those from the local bearing supplier, and the bike feels as good as new. Hopefully they last as long!
Cranks: Sugino RD-48 Single Speed Cranks
These cranks are great, and coupled to the Phil Wood Bottom Bracket above, give the perfect 54mm chainline for the Rohloff Speedhub.
We're not great fans of Shimano (purely due to the monopoly effect), but can say that these pedals are absolutely fantastic. They have never given any trouble and are basically bomb proof. No servicing required, which is the way we like it.
Chain: Various 8-Speed chains have been used: SRAM PC-850, PC-870, PC-890, Connex Wippermann 808
We've had good and bad experiences will all of the above, largely due to cog wear, and chain-tensioner slippage. Before the new frames, we generally changed the chains every 5,000km as this is when the chain-tensioner started to slip. Now with no tensioner, we're hoping to at least double the life of the chains we use. Time will tell.
For durability, the Surly Stainless Steel chainring cannot be beaten. We found that alloy chainrings lasted about 5,000km, but the Surly chainring looks almost unused at 15,000km. The great thing about using the Rohloff, is that when the chainring is worn-out, one can flip it over and use the other side, thus doubling its life! I've previously used a 38t chainring, but have recently changed to 42t just because they were significantly cheaper, and give me an extra gear where I want it. With this change, I basically lose the very lowest gear, but gain an additional gear at the top end.
UPDATE February 2011: The Surly chainrings have now done just over 34,000 km and 23,000 km respectively, and still barely show any wear (if any). These things are unbelievable!
Tyres (commuting): Schwalbe Marathon Plus 26 x 1.35
The Marathon Plus tyre must be the very best for commuting. We've tried Hutchinson Top Slicks (26x1.3), Continental Sport Contacts (26x1.3 and 23x1.6) and Continental Ultra Gatorskins (26x1+1/8), and nothing comes close to the Marathon Plus as far as puncture protection. It has a "SmartGuard" layer which is almost like a built-in tyre liner. We've pulled out 6mm long shards of glass and wire which hasn't punctured the tube. Unbelievable, and well worth the additional weight. In fact, we haven't found the weight to make any difference on the 26" wheels! The reflective sidewall also offers a bit of protection when commuting during the dark of winter.
Distances that we have achieved with the Marathon Plus tyres from new until the blue Smartguard liner material started showing:
– Mike (Rear Tyre): 10,624 km; 7,207 km; 10,169 km; 8,703 km.
– Mike (Front Tyre): 39,932 km (Smartguard not really showing, but tyre just looked too old with various cuts, etc!)
– Judith (Rear Tyre): 9,523 km; 9,639 km.
– Judith (Front Tyre): 27,715 km and still going strong! (April 2013).
Tyres (touring): Schwalbe Marathon Plus Tour 26 x 1.75
Having recently battled with the Continental Travel Contact (26x1.75 foldable) tyres with punctures and overall durability, we have now gone with the Schwalbe Tours. These look and feel like good quality tyres and if the marathon pluses are anything to go by, they should do a great job with mileage durability and puncture resistance.
Scottoiler: Automatic Chain Lubricator
I laughed at a friend who fitted one of these Bicycle Scottoilers to his commuter! Then I did some research and thought to give it a try. The chain remains so much cleaner using the specially formulated Active Fluid - You won't believe it until you try it! It's great that you never have to worry about oiling the chain, you can do it while on the go! You don't need to use it at all during the rain and the bike is absolutely "soundless". When the roads dry up and all the lube has washed off, you give the Squid (pump) a squeeze, and you're back to lubed and silence! I would also like to add that Scottoiler UK provided us with great service. Although somewhat off-the-wall, it's highly recommended for commuters.
When we started touring, we battled to find racks which could be fitted to our disc-braked mountain bikes. Old Man Mountain came to the rescue. Both bikes were fitted with a Cold Spring Rear Rack, and we also have a front rack if the tour requires it. The racks are aluminium so one needs to watch for friction wear, but they are super strong and highly recommended.
UPDATE July 2011: We have since changed our rear racks from OMM to the Tubus Cosmo stainless steel rack. The OMMs seemed to wear out too quickly with the daily commuting and touring and we are expecting that the stainless steel will fair better. So far (July 2011), after about 3,500km (1,850 km touring) there is barely a mark on them so things are looking promising. In order to get the fit right we needed the disk brake accessory kit. We don't use the extended quick release, but had to install spacers so that the disk brake could be avoided. This has worked well and the setup seems to be more sturdy than the aluminum OMM rack setup.
We've gone for the P55's which does leave quite a gap between the 1.3 tyre and guard, but they definitely keep one much dryer and cleaner during a wet commute. We don't bother with these for touring as they are more hassle than they are worth. The baggage and handle bar bag do a good job then!
Ortlieb Back-Roller & Front-Roller Plus Panniers, Rack Pack and Ultimate 3 RC Handlebar Bag
These panniers are really hardy and have performed flawlessly. They each have a couple of repair patches applied to them, but are still as waterproof as the day we got them. Great product.
UPDATE May 2012: Decided to buy new Back Roller Plus panniers as the sealing was starting to come adrift on the originals, and the bags didn't look like they would last another tour. For the amount of time they spent on the bike, and what they went through, we consider these panniers the best.
The brightest light you could wish for although Dinotte even makes a brighter one! Run times on flashing are brilliant, but I really battled with battery durability. This issue also led me to taking the 200L off the front. I had two batteries replaced under warranty (after following the recharging instructions to the letter) and can confirm that their service was generally good, but the cost of mailing the batteries back to the US was still for my account. I currently use an Ayup 6hr battery with this rear light and it works like a charm.
UPDATE December 2011: Wanting to do away with light batteries all together, I've recently purchased a Busch & Muller Toplight Line plus which I'll connect to the SON Dynamo/Edelux Light when winter rolls along. Looking forward to giving it a go. I'm hoping that I'll have something positive to report in the next few months.